Featured

June’s Sugar Cookie Blossoms

My grandma made the best Sugar Cookies. They were soft, moist, and made with love. She made them around the holidays, where I ate more than what my parents wanted me to. Let’s be real, most kids ride the sugar high from Thanksgiving till the New Years.

I took my grandma’s recipe, made some tweaks and Viola! Sugar Cookie Blossoms!  

Makes Approx 42 Cookies

Ingredients:

½ C Sugar

½ C Powdered Sugar

½ C Butter

½ C Oil

1 Egg

1 Tsp Vanilla

2 ½ C Flour

½ Tsp Baking Soda

1/8 Tsp Salt

½ Tsp Cream of Tartar

1 package of Sugar Cookie Kisses

*Sugar to roll cookies in. Can use colored sugar for a festive touch!

Instructions:

Preheat oven to 350°F.

Unwrap Sugar Cookie Kisses, and place in a bowl.

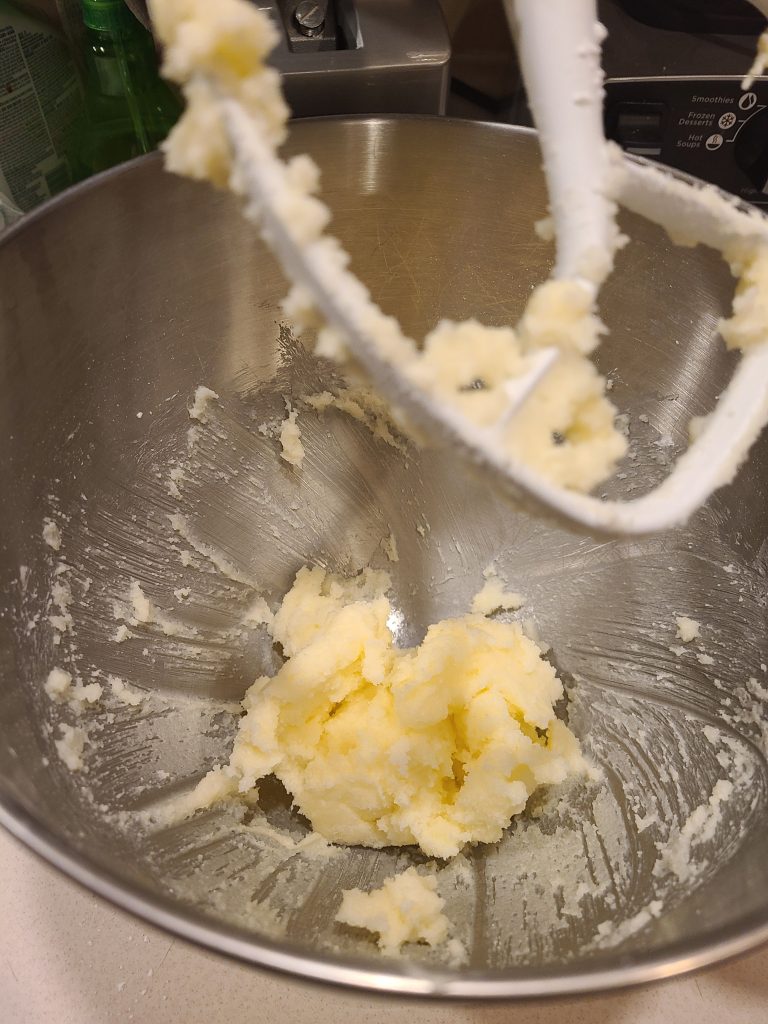
Cream butter, sugar and powdered sugar together.

What is better than butter and sugar creamed together?

Add oil egg and vanilla to mixture, and mix until smooth.

This mixture smells so good with the vanilla!

Add dry ingredients (flour, Baking Soda, Salt and Cream of Tartar) and mix.

Roll 1 1/2 tablespoons of dough into balls and roll in sugar. To be festive, you can use colored sugar!                                                                                       

Used green colored sugar… because this is 2020 and let’s be festive!!!

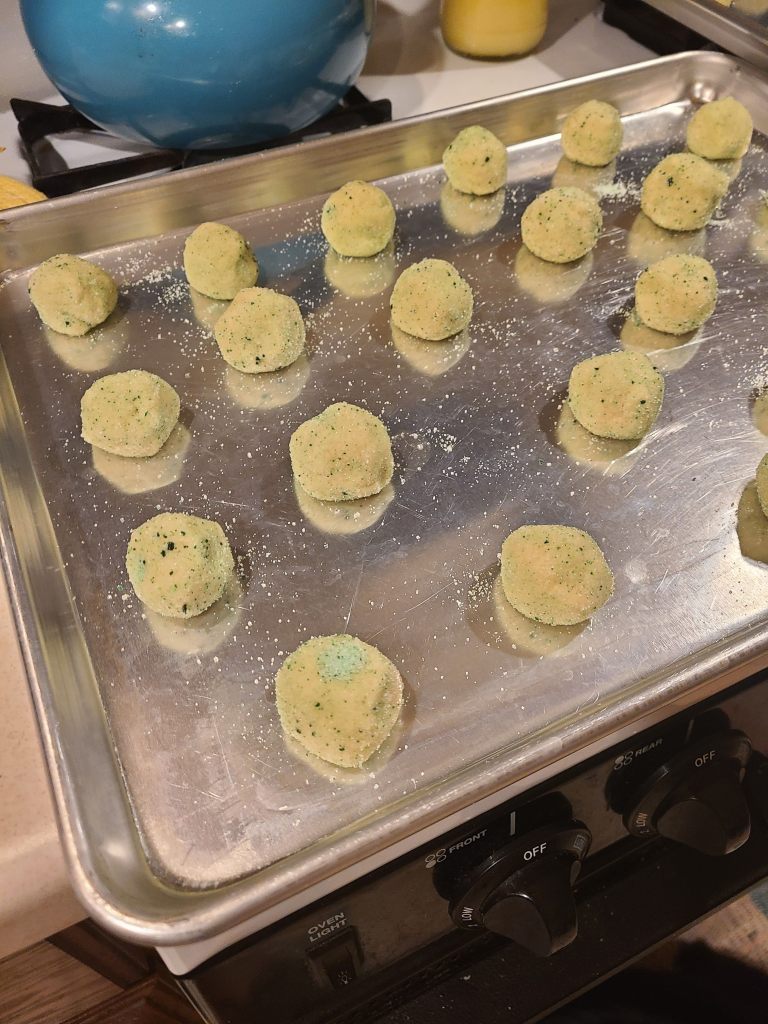
Place on a baking sheet leaving a 1 inch gap between each cookie.

Bake for 8- 10 minutes or until set and slightly brown.

Remove and press Sugar Cookie Kiss in the center of the cookie.

Allow to set on the baking sheet for 3 minutes before removing. Cool on cookie racks.

Enjoy!

Sugar Cookie Blossoms with Christmas Lights

BTW: River wanted to say hi, but fell asleep in front of the oven. I had to wake a sleepy Border Collie so that I could safely open the oven.

Sleepy Border Collie
Featured

Healthy Cucumber Salad

A summertime staple in my family’s house when our cucumber plants go crazy! Both of my parents have their own delicious versions of this recipe; however, they are loaded down with extra calories. I trimmed down on the extra’s, yet just as delectable as the originals.

Servings : 2-3

Ingredients:

(1) 6-7-inch-long cucumber thinly sliced

¼ of a red onion thinly sliced

½ cup plain Greek Yogurt

2 tbsp white distilled vinegar

¼ tsp dill

½ tsp ground pepper

Pinch of salt

Instructions:

In a 3-cup bowl add ½ cub of Greek Yogurt, vinegar, dill, salt and pepper. Stir until smooth.

Add thinly sliced cucumber and onion to sauce. Gently toss.

Refrigerate 2hrs or until ready to serve.

Enjoy!

Featured

Lemony Italian Rubbed Chicken

I have been grilling up a storm lately as the weather has finally warmed up in the Midwest! Summer is in the air and this is a perfect rub for grilled chicken.

Ingredients:

Zest of 1 Lemon

Couple of grinds of black pepper (2 pinches)

Couple grinds of salt (1 pinch)

1 tsp of an Italian Seasoning Mix

2-3 chicken breast

Instructions:

Mix the ingredients together.

This rub is amazing!

Add 1 tsp of the rub mixture to each chicken breast and rub into the meat.

Place chicken breast on a plate and cover with plastic wrap. Refrigerate for 1 hour or until ready to grill.

Preheat grill.

Place chicken breast on the grill and cook on each side for 8-10 minutes per side on medium high heat, until done. Chicken needs to have the internal temp of 165°f degrees.

Enjoy!

Featured

Roasted Chickpea and Quinoa Salad

Got chickpeas and Quinoa in the pantry? Looking for a simple meatless salad that could be a side or a main dish? Well this salad is for you!

Making a meatless salad is out of the norm for this farm girl, but sometimes a light salad is all that I want.

~4-6 servings

Ingredients:

3 cups of cooked Quinoa

1 can of Chickpeas Roasted

¼ c Red Onion chopped

4 Sweet Mini Peppers chopped

2 Sundried Tomatoes chopped

Juice of 1 lemon

¼ c Avocado oil

½ tsp Salt

½ tsp Pepper

1 tsp Garlic powder

1 tsp Parsley

1 tsp Oregano

Instructions:

Make 3 cups of quinoa according to manufactures directions.

Roast Chickpeas. If you don’t know how follow the recipe Savory Roasted Chickpeas. https://inthekitchenwithjohnnarose.com/?p=223.

Mix lemon juice, avocado oil and seasonings (salt, pepper, garlic powder, parsley, and oregano) in a large bowl.

Add chop red onions, mini peppers and sundried tomatoes to the bowl and mix.

Add cooled roasted chickpeas and quinoa to the bowl and mix.

Serve as a side or as simple lunch!

Refrigerate leftovers.

*Note: If you do not have Sweet mini peppers, you can use whatever pepper you have on hand. The same goes for the onions and oil. The lemon juice concentrate that you might have in the fridge will also work in this recipe.

Enjoy!

Featured

Chicken Sausage with Peppers and Onions

This is probably the most simplistic recipe ever, but to good to not share! I often make this as a simple dinner and is great for meal prepping.

~4-5 servings

Ingredients:

5 Chicken Sausages cut on the bias

5 Mini Sweet Peppers thinly sliced

½ Onion thinly sliced

1 tbsp Olive Oil               

Salt and Pepper

Instructions:

Cut the chicken sausages on the bias and thinly slice ½ onion and the peppers. Season with salt and pepper (about 1 pinch of each).

Add to frying pan with olive oil and cook until the sausages are golden brown and veggies are just soft.

Serve with brown rice.

Enjoy!

Featured

Refrigerated Pickled Red Onions

Last year I had such a cracking for pickled onions that I created this recipe, and brought them to my nephew’s second birthday party. We were having a cook out and they were perfect in the pasta salad that I made (that recipe is going to be up soon!), but also on burgers and brats. They were such a hit that my grandma called me while in quarantine and asked me how to make them!

Ingredients:

1 Medium Red Onion thinly sliced

½ cup Hot Water

¾ c Vinegar

2 tsp sugar

1 tsp salt

½ tsp cracked black pepper

Instructions:

Cut the onion in half from the root end to the top and thinly slice.

Pack the onion slices in a glass jar. All I had was a pint canning jar on hand, but if you have a quart one that would work also.

Next mix the sugar and salt in the hot water until dissolved. Then add the vinegar. I used white distilled vinegar for this batch, but have used apple cider vinegar once. Use what you can use whatever you have on hand.

Add the cracked black pepper to the mixture and pour over onions.

Depending on the size of container, there might be extra “sauce”.

Cover, and place in the refrigerator.

Let sit for at least 30 minutes prior to use.

Will last in the refrigerator for up to 6 weeks!

Enjoy!

Featured

A little Quarantine Catch Up

I just wanted to write a little update on what has been happening at In The Kitchen with Johnna Rose, and like a true farm girl fashion I am writing this while drinking coffee at the kitchen table. In my family the kitchen table is where we had family meetings, meals, wrote out bills and was the center of the house.

I hope all is well with you and your family and that everyone is safe during these crazy times! My family in Minnesota is safe and sound at home right now, except those who are considered essential employees. No, we are not nurse’s or doctor’s, but work in manufacturing from building/fixing semi-trailers to transport supplies to the stores, cleaning nursing homes, and like myself working in a food processing plant to ensure that there is food in the grocery store. We are all tired, but continue to work to provide for our communities and country.

Yes, these times are weird right now. Just 2 months ago, there was food on the shelves in the local grocery stores, no one wearing masks and things were “normal”. I don’t know if our way of life is going to be going back to normal, but all we can do is embrace the new. I know I am doing all that I can to embrace this new environment we are living in by:

  • Wearing a face mask while out in public.
On my way to the Grocery Store
  • Reducing my trips to the grocery store.
  • Making my truck bed and tailgate a dirty zone where I sanitize packaging prior to bringing it into the house.
“Dirty” Zone where I wipe down all of the groceries before bringing in the house.

During this time, I have been working on content for you all with everyday ingredients that you probably have in your pantry right now. My mission during this time is to create health, simple recipes that do not require a ton of ingredients and that you would probably have them on hand (no need to go out to the grocery store). A couple of sneak peak recipes are a Homemade Hamburger Hotdish, Banana Bread Muffins, and a Italian Lemon Chicken Rub :)/ If there is anything recipe that you would like to work on, or would like to see more of please let me know. Comment or  send me an email at inthekitchenwithjohnnarose@gmail.com.

Stay Safe, Stay Healthy and Stay Sanitized!  

River wanted to say HI!
Featured

Savory Roasted Chickpeas

So… you bought a can of chickpeas or garbanzo beans and do not know what to do with them. Well these little guys are a good source of plant based protein and fiber!

A few years ago, I started making Roasted Chickpeas as a healthy snack to have around the house. But I also add them to salads as the protein.

Ingredients:

1 15.5 oz can of Chickpeas

1 ½ T Olive Oil

¼ t Garlic Powder

¼ t Cayenne Pepper Powder

¼ t Italian herb mix. I use Tuscan Sunset from Penzeys.

Instructions:

Preheat oven for 350°f.

Open can of chickpeas, drain and rinse well.

Remove extra moisture from the chickpeas with a paper towel then place in a small bowl.

Toss with Olive oil, garlic powder, cayenne pepper powder and Italian herb mix.

Toss chickpeas with olive oil to coat.

Add garlic powder, cayenne pepper powder and Italian herb mix. Stir to cover chickpeas.

Place on to a sheet pan in a single layer.

Bake for 25 minutes, taking out to stir 3 times. Chickpeas are done when they are a golden brown.

Remove from oven, let cool and ENJOY!

*Storage Tip* Store the chickpeas in the refrigerator for up to one week.

Featured

Johnna’s Venison Chili

I created this Chili recipe after I graduated college and had more ground venison in my freezer than ground beef. That could be from my parents filled my freezer with it when I moved out.

This recipe is similar to how my mom makes her chili, and is a must if having cornbread muffins. Seriously this recipe is so simple and that after you brown the ground venison, the crock pot does the rest of the work for you!!

If you do not have ground venison, any type of ground meat will work.

Ingredients:

1 lb of ground venison

1 medium onion diced

1 15oz can of diced tomatoes

2 15oz cans of tomato sauce

1 15oz can of light kidney beans

¼ cup Chili powder

½ tsp Cayenne Pepper

½ tsp Garlic powder

½ tsp Pepper

Instructions:

In a medium skillet brown ground venison and cook down the chopped onion.

Add ground venison and onion to a 6 quart crock pot.

Add 1 can of diced tomatoes and the two cans of tomato sauce.

Diced tomatoes and tomato sauce.

Next add 1 can of kidney beans. DO not rinse off those beans!

Add seasonings (Chili Powder, Cayenne Pepper, Garlic Powder and Pepper). Note I did not add salt as the salt will come from the canned kidney beans and the juice will work as a natural thickening agent for the chili.

All of the seasonings.

Stir.

Cook on low for 6-9 hours or on high for 2-4hrs.

Serve with shredded cheddar cheese and cornbread muffins.

Enjoy!

I often make a big batch of this and will freeze a few servings for days when I need a quick meal. Can be kept in the freezer for up to 3 months. Reheat on stove or in the microwave.

River was asleep and did not notice that mom dropped a couple of crumbs of cornbread in-front of her.
Featured

Grandma’s Corned Beef

Corned beef is not just for St. Patrick’s Day. Heck in our family we often have it during any other holiday or when we visit my grandparents. My grandma learned how to make delectable corned beef from my great aunt who adds potatoes, rutabagas and cabbage to her recipe.

Now… I tend to get my corned beef at Aldi’s. This ironically is the same place where my grandma gets hers and we often stock up when it is on sale. There are two different cuts of corned beef, a point cut and a flat cut. Both are equally delicious, but my grandpa prefers the flat cut which is leaner without a lot the intramuscular marbling.

Ingredients:

1 3-5lb corned beef with seasoning packet

1 onion chopped

1 8oz can of beer

Instructions:

Place corned beef with the fat side up in a 6 quart crock pot.

Sprinkle seasoning packet on top of the corned beef.

Sprinkle the seasoning packet on the meat!

Place chopped onions on top of the corned beef.

Add chopped onions. Does not matter what type.

Pour 1 can of beef on the side of the corned beef and the crock pot. Do not pour over the meat. (I used a larger can, so that I could have some leftovers as a quality sample 😉)

Pour the beer on the side of the crockpot and the corned beef. Use whatever type you normally drink.

Place lid on and cook on low for 6 to 8 hours.

Can you see the steam rolling off?!

Enjoy with potatoes and your favorite veggie!

I completed the meal with mashed baby potatoes and oven roasted asparagus with a glass of milk.

Hope you enjoy this recipe. Have a save and Happy St. Patrick’s Day!

Featured

Mom’s Cornbread Muffins

Makes 18 Muffins

One of the first recipes that my mom taught me how to bake was her cornbread muffins. After that it was my job to make the cornbread muffins (with adult supervision) whenever we had chili. I demonstrated this recipe to the class when I was in 3rd grade and then once again in my Sophomore year of high school. You can almost say that I can almost make these muffins in my sleep!

Enjoy these muffins with your favorite chili recipe. Or freshly out of the oven with butter and honey!

Ingredients:

1 cup Flour

1 cup Cornmeal

1 T baking powder

3 T sugar

2 eggs

1 cup milk

3 T oil

½ t salt

Instructions:

Preheat oven to 400°F

Grease muffin tin.

Add ingredients to a medium sized mixing bowl, and mix.

Get ready to mix!
All mixed up.

Fill muffin tins half full and bake for 15 minutes.

Muffins are done when a toothpick is inserted and comes out clean.

Remove from muffin tin.

Perfectly little muffins!!

Enjoy!

Perfect for a dessert with some melted putter and honey.

Storage Tip: Store in a plastic bag in the refrigerator for 1 week. Can be warmed in the microwave for 30 seconds.

Featured

Chicken Fajita Rice Bowl

Serving 4-6

As of lately I have been loving anything Tex-Mex that has some kick. Growing up the only thing we got that was close was your basic ground beef tacos with a extra mild seasoning. We did not even use salsa because I did not like tomatoes. Now I love salsa on almost everything. Funny how time changes and your so taste buds.

This is a one pot meal that will surely be a hit with the family!

Ingredients:

1 chicken breast

1c brown rice

1 ½ c chicken broth or water

1 cup salsa

2 cups of frozen pepper and onion veggie mix

1/8c taco seasoning

2 tablespoons avocado oil

¼ tsp salt and pepper

Instructions:

Season the chicken breast with salt and pepper.

Using your instant pot, press sauté function and wait till your display reads hot.

Add avocado oil and seasoned chicken breast to the pan and for 3 minutes on each side.

Carefully add in the chicken broth to deglaze the pan.

Add in the rice. Do not stir.

Top the chicken breast with your favorite salsa.

Add the frozen pepper and onion veggie mix to the pot.

Top chicken breast with salsa, veggies and then sprinkle with your favorite taco seasoning.

Sprinkle the taco seasoning over veggies, chicken and rice mixture.

Turn off the sauté function. Place the lid on instant pot and turn the knob into the sealing function.

Using the Manual/Pressure cook function. Cook on high pressure for 28 minutes with a 10-minute natural release.

Your almost there. Take out the chicken, shred it, add back in.

When done. Remove chicken and shred. Add back to the pot and stir into the rice and veggie mixture.

If desired top with shredded cheese.

After all of the photos taken, and sitting down to eat dinner. River thought she could be official taste tester as well.

Enjoy!  

Featured

Farm House Quiche

A farmhouse quiche uses what is on hand and makes the most pickiest eater asking for seconds.

I started learning on how to make quiche’s after I tried one at a brunch and I was hooked. The only problem I had was, how do I make one that my dad and brother would love. The trick… bacon and cheese.

Ingredients:

Pie Crust (Can be the refrigerated pie crust or homemade)

4 -6 eggs

1/2 cup of shredded cheese

¼ cup of bacon bits

¼ teaspoon salt

¼ teaspoon pepper

½ of a green or red pepper sliced.

½ cup of milk

Instructions:

Preheat oven to 350°F.

I have made quiches with both homemade pie crust and also store bought. Use what you want, and what is on hand.

Roll out pie crust into an 8 or 9 inch pie plate. Take a fork and poke some holes in the bottom of the crust.

For a flaky crust, bake the pie crust for 5-10 minutes. This allows the crust to get heated, and to jump start the cooking process.

In a bowl crack 4-6 eggs and milk. Beat until combined.  

After the Holidays, my mom send me home with a dozen of eggs and a note. She is always hiding little notes in our stuff.
Mix until combined.

Add bacon bites, cheese (reserving about 1 tablespoon for topping), salt and pepper and beat until combined.

Carefully pour egg mixture into prepared pie crust.

Sprinkle on the reserved bacon and shredded cheese.

Just remember the crust does not need to be perfect. This is a farm house quiche.

Add sliced peppers to the egg mixture. This is when I get fancy and place them in a fun pattern.

Place the pie plate on to a cookie sheet, this will make for an easy oven clean up if your quiche is runiths over. Trust me cleaning an oven or setting off the smoke alarms is not fun!

Bake for 25-35 minutes, or until the eggs have set (no jiggle) and when cut with a knife it comes out clean.

Let cool for 5 minutes.

Enjoy!

Note: Leftovers (lets be real… there won’t be any) can be kept in the refrigerator for up to 3 days and reheated in the microwave from 30 seconds to 1 minute depending on the wattage.

Featured

Oven Roasted Asparagus

In a previous post I stated that I did not like vegetables, and that is a fact. I now eat them and one of the first vegetables that I actually started to crave was Roasted Asparagus. Yes, a vegetable that some adults shy away from because it is either to hard to prepare, to woody or they just don’t know how to make it. Well hopefully this post will convert the non- asparagus lovers over to the asparagus loving side!

Ingredients:

1 bunch of Asparagus

2 tablespoons of olive oil

Juice of 1 lemon

Pinch of salt

Couple grinds of fresh pepper

Preheat oven to 400°F.

Wash and Trim Asparagus

  • When you pick asparagus out at the grocery store, I find pick spears that are thin and roughly the size of your pinky finger. These spears will be more tender, and less woody.
  • When I trim asparagus, I grasp both ends of the asparagus spear and bend the pieces together. Where spear “snaps” is the point where the woody portion ends. I then lay the snapped end next to the rest of the spears and cut off the woody ends.
Bend the ends of the spear together till it “snaps”.
Place the “snapped” spear next to the uncut spears to use it as a guide. Cut off the woody ends.

Place on a baking sheet and add oil, lemon juice, salt and pepper. Stir to coat the asparagus.

Place in oven and bake for 10 minutes, stirring half way. Check after 10 minutes, if the asparagus is not easily poked by a fork place back in the oven for another 5 minutes. Asparagus is done when it can be easily poked by a fork and is slightly browned.

Slightly browned asparagus.

Enjoy!

*Note- if you do not have a fresh lemon on hand, you can use 1 tablespoon of lemon juice concentrate.

The roasted asparagus pairs well with roasted fish and a rice/quinoa mix 🙂
Featured

Smoked Gouda Cranberry Cheeseball

The holiday season is upon us and this means parties and family get togethers! This cheeseball adds a savory, smoky with a bit of sweetness to any appetizer table.

I often use my family and friends as my taste testers for recipes and this one was critiqued during Thanksgiving. Per my dad “The Cranberries round out this recipe and help balance the smokiness from the gouda”. I almost dropped the gravy that I was making when he said that, as my dad is a man of few words.

Smoked Gouda Cranberry Cheeseball

Ingredients:

1 package of cream cheese softened

½ c shredded smoked gouda

½ c shredded aged gouda

½ c shredded sharp cheddar

½ teaspoon ground white pepper

½ teaspoon smoked paprika

Sweetened dried cranberries roughly chopped

Add soften cream cheese and seasonings (ground white pepper and smoked paprika to a bowl).

Using an electric hand mixer combine ingredients together. At this time, I will sample the now seasoned cream cheese and if I feel that it needs some extra pepper or paprika this is the time to do so!

Add shredded cheese and mix.

Form into a ball and wrap in plastic wrap. Chill a minimum of 30 minutes or until ready to use!

Remove plastic wrap and roll in sweetened dried cranberries.

Serve with crackers, pretzels and veggies.

Enjoy

If you make this recipe, please show me your creations at @inthekitchenwithjohnnarose on Instagram or #IntheKitchenwithJohnnaRose

Featured

Cheddar Bacon Ranch Cheese ball

I grew up in a time where cheeseballs were not a big thing, but I feel that it is my duty to bring them back into everyone’s kitchen! These creamy balls of cheesy goodness are very simple to make once you know the basic ratios of cream cheese, shredded cheese and seasonings!

This recipe makes one large cheese ball or two medium ones that are just the perfect size as an appetizer for a party of 10 with an extra one for snacks after the party! Okay, that might be what I do in my family and it works. Last year on Christmas Day my brother specifically asked me it I had one of those cheese bally things and lucky for him there was a one in refrigerator ready!

Cheddar Bacon Ranch Cheese Ball

Ingredients:

1 package of cream cheese softened

1 to ½ c shredded cheddar cheese

  • I have used pre-shredded cheddar cheese and also shredded my own. Both work just fine.

1 and ½ tablespoon of dry ranch seasoning

4oz of bacon bits

Add soften cheese, ranch seasoning to a bowl.

Using an electric hand mixer combine ingredients together. Fun fact when I started making cheese balls every recipe and tutorial told me to use a food processor. I did not have one so I grabbed my trusty electric hand mixer and it works just fine!

Add shredded cheddar cheese and just mix.

Form into the size of ball desired. Wrap in plastic wrap to chill for a minimum of 30 minutes or until ready to serve.

Remove plastic wrap and roll in bacon bits!

Place on a pretty platter and serve with crackers, pretzels, and veggies.

Enjoy!  

Featured

Breakfast Burritos

Eggs, Sausage and Cheese are a perfect breakfast, but when wrapped in a tortilla shelf they can make early morning so much better! I started making these breakfast burritos when I was in graduate school while working full time. I needed a needed a nutritious breakfast that could be made during a meal prepping section and was quick to reheat. Enjoy with fresh fruit and a dipping sauce of either salsa, taco sauce or maybe some Ranch.

(1) 16oz package of ground seasoned breakfast sausage.

10 eggs

1 ½ cups of shredded cheddar cheese

1 package of tortilla 10 ct

Salt and Pepper to taste

Cooking Instructions:

Preheat oven to 325°F

In a medium sized frying pan, brown ground seasoned breakfast sausage and set aside. The sausage that I used in the photos is a venison breakfast sausage that my family has in an abundance.

Whisk eggs and salt and pepper together. Add to the same frying pan that was used to brown the breakfast sausage. Scramble eggs on low heat until cooked through.

Now it is time for the burrito making process!!! This process can be challenging if you do not know how to roll a burrito. It took me many burritos to perfect it. Okay maybe not perfect… I still have a burrito or two that go rogue, but those suckers still taste just as good!

Lay out your tortilla on a clean flat surface.

Add approximately 1/8 c of cheese, browned breakfast sausage and eggs to tortilla a little off center in a straight line. This is shown in the picture of the cheese. I have made these burritos using different types of cheese such as (cheddar, pepper jack, colby jack and mozzarella) and they came out fantastic each time.  

Fold the ends of the towards the center of the tortilla.

Short ends fold in and hold.

Then with the side closest to you fold way and tightly roll.

Fold the side closest to you over the filling and roll.

Place on to a baking sheet with seam down and place in the oven for 10-15 minutes or until cheese is melted and the tortilla shell is just crispy.

Place on a baking sheet.

These burritos can be frozen for up to 3 months. Just omit the baking step and place the baking sheet into a freezer for 1 hour or until frozen. Place into a freezer safe container or baggie. When ready to eat, wrap a damp paper towel around the burrito and place on a microwave safe plate. Microwave for 90 seconds or until hot.

Enjoy.

Such a pretty burrito on my parents dinner plates which originally belonged to my grandma.
Close up of the cheesy, eggy and sausage breakfast!

Featured

My First Blog Post

Instant Pot Venison Chops with Sautéed Mushrooms

While I was prepping for this blog, I kept trying to figure out what I should do for my first recipe. Should it be my famous grilled potatoes, my go to pasta salad… I don’t know where you’re at, but in the upper Midwest it is cooled outside, so grilling and a cold pasta salad does not seem right.

Then I looked at the calendar and remembered what is coming up in Minnesota this weekend. Deer Hunting. In my family it is a tradition that my Dad has passed down to my Brother and I, and this recipe is a spin on the slow cooker version my Mom made while growing it. Instead of waiting all day for a meal, this one takes about 40 minutes!

Now this recipe cuts down the cooking times, well you use an Electronic Pressure Cooker such as the Instant Pot.

Instant Pot Venison Chops with Sautéed Mushrooms

1 package of Venison Chops or Steaks

1 T Avocado Oil

1 package of mushroom slices or 1 small can of mushroom slices (yes canned mushrooms will work just fine)

1 can of cream of mushroom soup

1 cup of water in 1/2c increments

1 T Dried Minced Onions

Salt and Pepper

  1. Using the saute function heat the multi-function cooker with Avocado Oil
  2. Season chops with salt and pepper
  3. Add chops and mushrooms and dried minced onions to multi-function cooker. Brown both sides of the meat about 4 minutes each side. During this time stir the mushrooms having them cook down.
  4. Add 1/2c of water to the multi-function cooker to de-glaze the pot.
  5. Mix the remaining 1/2c of water and cream of mushroom soup together. Add to the multi-function cooker pot.
  6. Turn off saute function. Place lid on the multi-function cooker, place the vent in the sealed position. Select the pressure cook function, in the high pressure section add 15 minutes to the cooker.
  7. When the 15 mins let the multi-function cooker naturally release for 10 minutes then open.
  8. Serve with mashed potatoes, rice or cauliflower rice.
  9. Enjoy!
Finished Product in Multi-Function Cooker
I know this does not the best, but trust me it is amazing!  
PS. I was going to take a pretty picture final product, the chops were to delicious to wait!

Cheesy Hamburger Pasta

I grew up eating a lot of ground beef with the classic box helper. Not going to name name’s but it was a staple in the house as we had beef and those boxes were cheap! We even just listed of the varieties as meals.

Now those boxes are expensive and do not taste the same as what they used to. I have also been watching what I eat and decided to recreate one of my childhood favorites.

~4-5 servings

Ingredients:

2 celery stocks diced

3 Mini Sweet Peppers diced (or ½ of a bell pepper diced)

2 shallots diced (or ½ medium onion diced)

¾ to 1 lb of ground beef ( I have found that some packages of ground beef are not a full pound so use what you can).

8 ounces of Pasta

3 cups Beef Stock

1 ½ cup shredded cheese

2 ½ tbsp Tomato Paste

1 tsp Garlic chopped

1 tsp Basil

½ tsp Thyme

½ tsp Pepper

Instructions:

Add ground beef to a large frying pan and brown.

When the ground beef is almost browned add peppers, shallots and celery. Continue to cook until veggies are soft.

Next add tomato paste and seasonings to frying pan and cook until fragrant about 3 minutes.

Now there will be brown bits on the frying pan. That is flavor in the making! Slowly add beef broth to pan to deglaze pan.

Bring pan to a boil and add pasta and reduce to simmer. Cover and cook to manufactures directions (approx. 8-12mins).

Once pasta is done, slowly stir in shredded cheese.

Allow the hamburger pasta to rest about 5 minutes to thicken.

Optional: Garnish with parsley and shredded cheese.

Enjoy!

*Note: I did not add salt to the recipe as the beef stock I used had more than enough. If you are using a low sodium broth you might want to add salt. Taste as you go.

Banana Bread Muffins

Has anyone bought to many banana’s and they started getting to many brown spots? Okay that never happens in my house because I am one of those weirdos who likes brown spots on a banana. These muffins are a perfect way to use extra bananas. They also make a perfect addition to any breakfast or as a dessert.

~Makes 12 muffins

Ingredients:

2 Ripe Bananas

1 ½ c Flour

¾ c Sugar

1 Egg slightly beaten

1/3 c Melted butter slightly cooled

1 tsp Baking Soda

½ tsp Salt

1 tsp Vanilla

½ tsp Cinnamon

¼ tsp Ground Nutmeg

2 tbsp Mini chocolate chips

Instructions:

Preheat oven to 375°f.

Line muffin tin with liners.

In a medium sized bowl mash 2 ripe bananas, with a fork. Make sure there are no large chunks.

Add egg, melted butter, vanilla and sugar. Stir.

Add remainder of dry ingredients (flour, salt, baking soda, cinnamon and nutmeg). Mix until just combined.

Spoon into prepared muffin tin till 3/4th full.

Sprinkle mini chocolate chips onto the top of the batter.

Bake 18-22 minutes until toothpick comes out clean.

Enjoy!!